

Publish-AppImage for .NET is a simple bash script deployment utility which calls dotnet publish and packages the output as an AppImage file (or zip) with a single command. The Linux “Desktop Entry” file is generated automatically.
On Github:
It is licensed under MIT and for use on Linux with the Microsoft .NET SDK (i.e. for C# applications).
Pre-requisits
Publish-AppImage for .NET requires:
- Bash shell
- .NET SDK 5.0 or later
- The appimagetool utility to build the AppImage file
- The Linux “zip” utility is optional and typically may already be installed on your system
Tested against .NET 5.0, bash 4.4.20, Zorin OS 15.3 (Ubuntu 18.04 LTS), appimagetool r13 (31 Dec 2020).
Build HelloWorld
The github repository provides a simple “HelloWorld” terminal demo application.
Download and install appimagetool. Ensure that appimagetool is in the path, or you can specify its location in the .conf file if you have downloaded it as an AppImage.
For example, in publish-appimage.conf, change this line:
APPIMAGETOOL_COMMAND="appimagetool"
to this as appropriate:
APPIMAGETOOL_COMMAND="/home/user/Apps/appimagetool-x86_64.AppImage"
The publish-appimage is just a bash script so there is no need to “build” it, but ensure that it has the executable flag set. From the top-level project directory, simply type:
./publish-appimage
This will call dot publish and create the output local to the .conf file, i.e.: AppImages/HelloWorld-x86_64.AppImage
Use in Your Project
There are only two files you really need. Drop the files, below, into your application source preferably at the same level as your solution (.sln) or project (.csproj) file. If you do not put publish-appimage.conf in the same directory as your .sln or .csproj, you should specify the project location in the .conf file.
publish-appimage– the utilitypublish-appimage.conf– project config
Alternatively, you may put the publish-appimage file in any directory on your system and add the directory to the PATH. This way, only the “.conf file” need go into your project.
Note, by default, publish-appimage will look for the publish-appimage.conf file (of that name) in the current working directly. However, all project related paths in the .conf file itself are relative to the location of the .conf, and not from where command was called.
Edit the configuration file for your application, providing an application name etc. This should be a relatively trivial matter and all parameters are documented with comments. You can specify application “Desktop Entry” fields here, as well as publish/build arguments, and project and output locations.
An icon and appdata.xml may optionally be included in the AppImage. See the HelloWorld demo to see how this is done.
Command Line Usage
Target Platform
By default, publish-appimage will build for “linux-x64”. However, you can specify the dotnet “runtime identifier” as:
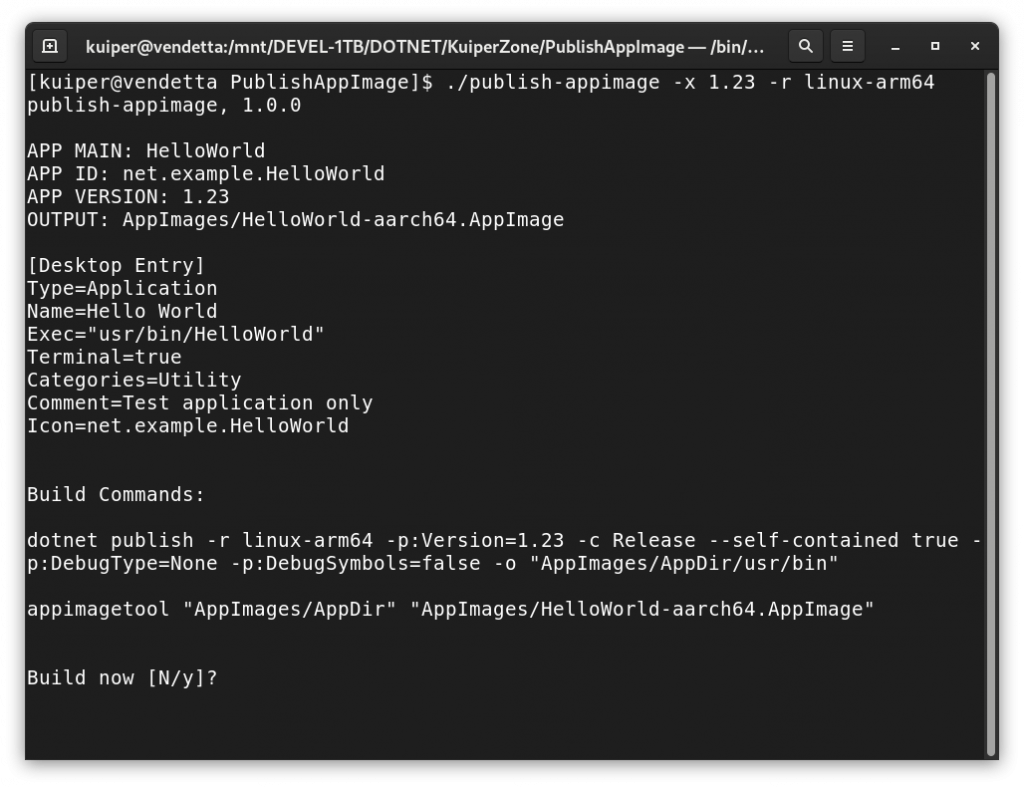
./publish-appimage.conf -r linux-arm64
For information, see: https://docs.microsoft.com/en-us/dotnet/core/rid-catalog
Version
It’s possible to provide your application version at the command-line:
./publish-appimage.conf -x 1.2.3
This will call publish with the -p:Version option and set the VERSION environment variable for use by appimagetool. In the .conf file, there is also an option to version the output package filename.
Conf Filename
Your application source project may contain multiple .conf files, and can you specify the configuration to use at the command line:
./publish-appimage.conf -f other-file.conf
Zip and Windows?
Amazingly, it is possible to build for Windows on a Linux box, although the binary is not suitable for use with the AppImage format. However, you can do this instead:
./publish-appimage.conf -r win-x64 -k zip
This will create a simple zip file of the published content instead of an AppImage file.
All Options
Usage:
    publish-appimage [-flags] [-option-n value-n]

Help Options:
    -h, --help
    Show help information flag.

    -v, --version
    Show version information flag.

Build Options:
    -f, --conf value
    Specifies the conf file. Defaults to publish-appimage.conf.

    -r, --runtime value
    Dotnet publish runtime identifier. Valid examples include:
    linux-x64 and linux-arm64. Default is linux-x64 if unspecified.
    See also: https://docs.microsoft.com/en-us/dotnet/core/rid-catalog

    -x, --app-version value
    Application version supplied to the dotnet publish command as -p:Version=value.
    It may also be used to form the output file. Example: --app-version 1.2.3.

    -k, --kind value
    Package output kind. Value must be one of: appimage or zip.
    Default is appimage if unspecified.

    -b, --verbose
    Verbose review info output flag.

    -u, --run
    Run the application after successful build flag.

    -y, --skip-yes
    Skip confirmation prompt flag (assumes yes).
Additional Information
Publish-AppImage for .NET was created by Andy Thomas at https://kuiper.zone
For a cross-platform .NET GUI application: https://kuiper.zone/shannon-calculator-avalonia
Gotcha – symlink
Symlink is disabled in VirtualBox shared folders and will prevent appimagetool from working. It is possible to enable them in VirtualBox. Alternatively, copy to the project to your home directory in the virtual machine.
Non-.NET Projects?
I included the option of a “post-publish” command which may also serve to build a non-.NET project (i.e. C++). However, I don’t imagine this will be a primary use case. Peruse the .conf parameters to learn more.
Flatpak?
I initially intended that this utility spit out Flatpaks as well as AppImages. However, the configuration and building of Flatpaks adds complexity. For the moment, I decided that this project was best served by keeping things simple and elegant. I may do something on this a later, however.
Don’t forget to like (star) and share this project (but only if you do like it of course).